Friday 22 January 2016

Tazzuh! The Candlestick and Talk is Cheap


Merry Xmas... I'm studying in an
empty burger stand... which is
currently leaking...
So, here I am, hiding from the sun (and occasional freak storms) in an abandoned burger stand, in a rundown showground, in the town of St Marys, about 15min drive away from Fingal and Bare Rock, working on my Diploma of Project Management on my laptop.

#VanLife? - I know you're dying of Van Envy.


I've been living down here in my van since early
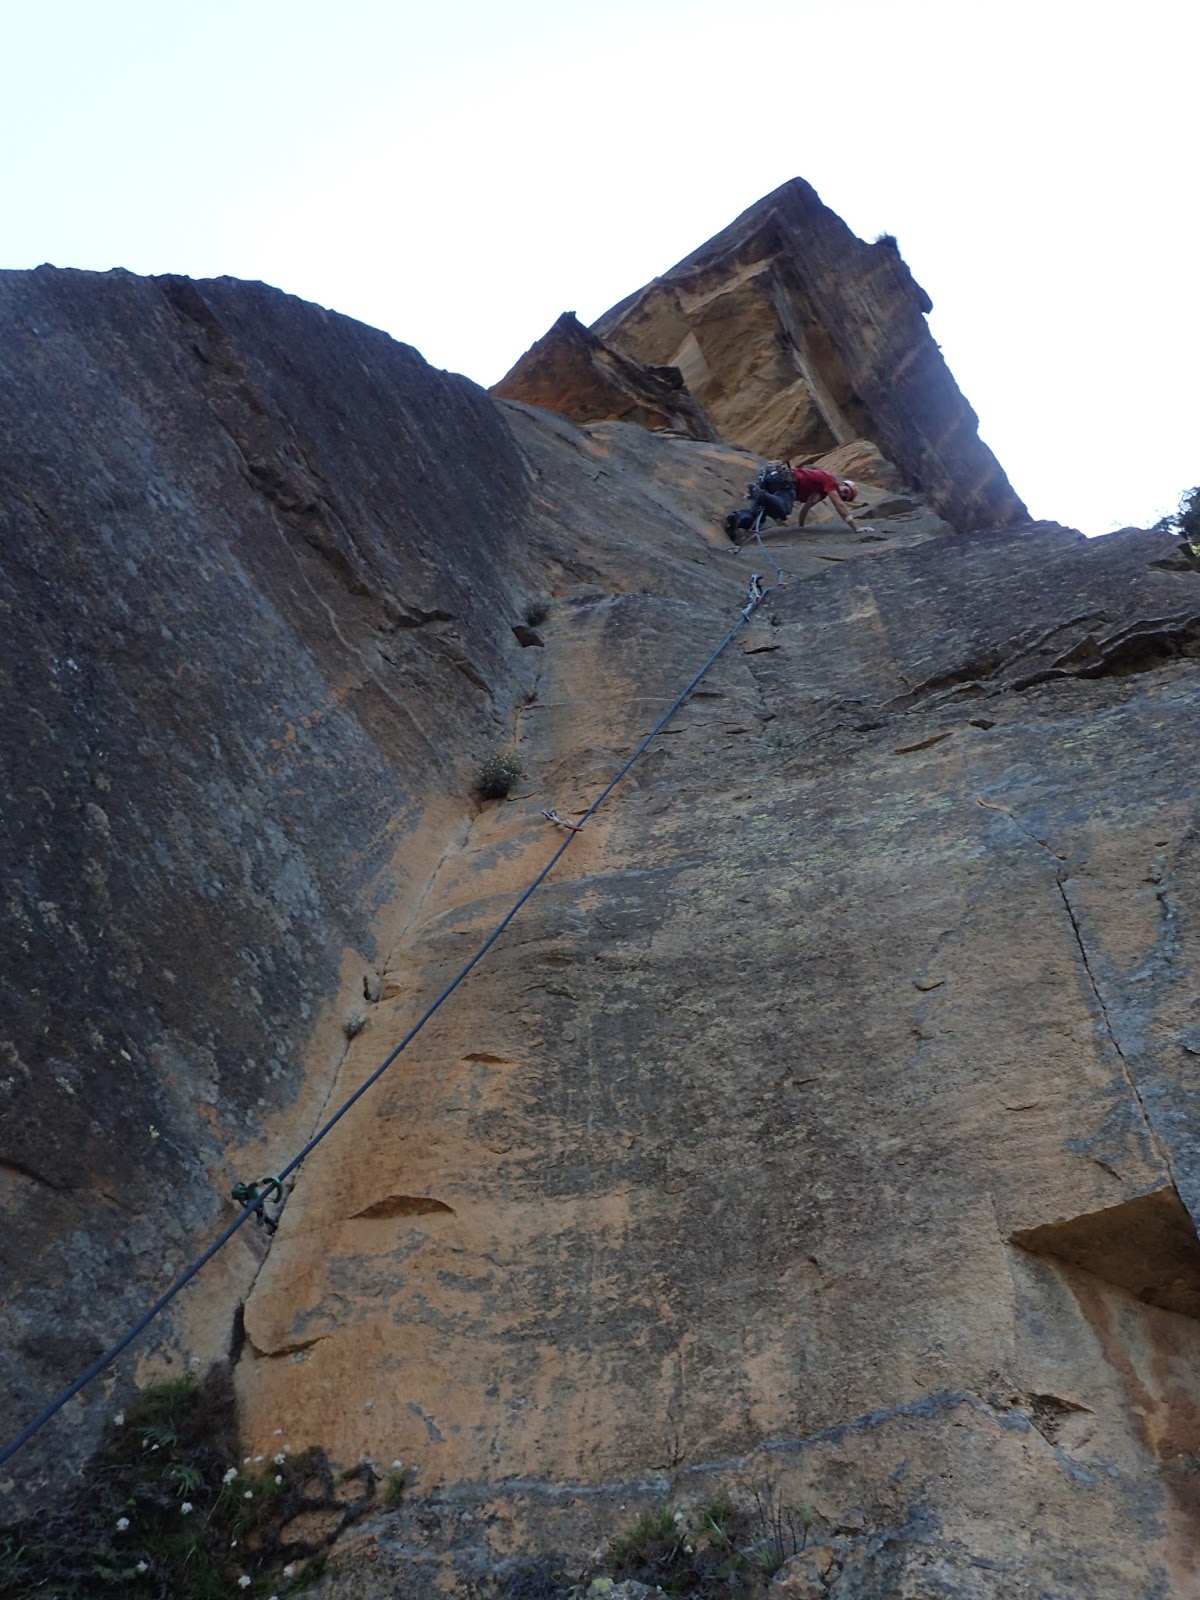
Mid-crux on the stunning Angel of Pain (26/27) at
Bare Rock. This bit doesn't look like the crux... but
it is.
The line goes through all the steepness above.
December, on a sojourn to the remote island nation of the Republic of Tasmania, ruled over by the regal descendants of James Boag since 1883**. In between the 5 minutes of study I've actually gotten done in the past month, I've been climbing like a madman with my fellow mainlanders: Scotty Wearin, Hugh Sutherland, Zack Swander, Carlos Castillo, Wade Steward and Viona Young, occasionally being joined by the local stock for some exciting adventures.

** - Some or all of this sentence might be bullshit.

I've spent a lot of time at Bare Rock, siege-ing away at my Project "The Obsidian Obsession": 25m of some of the most amazingly intense climbing up an immaculate black streak, situated 150m above the ground. But that's a story for another day (when hopefully I'm closer to ticking this monster), instead, I wanted to share with you some of the more successful outings I've had so far.

Aside from ticking my old nemesis Angel of Pain (30m mixed 26/27) and the technical poetry of Velvet Morning (33m 26) at Bare Rock, I've spent time trying to tick some of the harder "classics" at The Organ Pipes (such as The Colour of Magic (Mixed 26), Blank Generation (Trad 22 - once regarded as a death route, but okay with C3s), the Tower of Power (60m 25 arete) and Mildly Amused (35m Mixed 25 - which I was stoked to Onsight). I've also hit up the more conventional cragging areas (well... as conventional as it's possible to be in Tassie) of The Paradiso and Duck Reach at Cataract Gorge, and climbed almost all of the harder sport Multipitches going up the guts of the 200m black face on Bare Rock (Sapphire Rose (3-pitch 22), God Monster (4-pitch 25), Black Fire (4-pitch 25) and Into the Mystic (5-pitch 25).

But in the more familiar territory of obscure adventures, two really stand out:


The Candlestick


The Mainland at Cape Huay (Far Left), The Candlestick (The Central Pillar) and
the iconic Totem Pole (dwarfed between them). The other enormous land
masses to the right are also not connected to the mainland or each other.

Source: Australian Traveller - 100 Best Views in Australia: Cape Huay
http://www.australiantraveller.com/hobart/017-cape-hauy-tas/

The Candlestick is the monolithic pillar that looms over the almost insignificant Totem Pole, dwarfing it in size, but without the reputation (or improbably geometry). Having Onsighted both pitches of The Free Route (2-pitch Mixed 25) last year, spent a full day working The Freed Route/The Ewbank Route (4-pitch Trad 27), and accompanied friends out to the Tote as a photographer of their ascents, I've spent an awful lot of time starting at The Candlestick, and enduring that nagging feeling that it was a disappointingly blank space on my Aussie Adventure Climbing Resume.

This is the beginning of a new fashion in
Rock Climbing... Ladies, can you believe
that this guy is single?
The Candlestick is a very different beast to The Totem Pole. Larger, uglier, technically easier, looser, very Trad, more adventurous, and requiring far more advanced ropecraft skills than the Totem Pole (which requires a fairly high level of ropecraft know-how in itself). But aside from all of this, the biggest hurdle to summitting The Candlestick is the difficulty of getting to it: as it resides on the other side of the Totem Pole, approximately 15 horizontal meters from the mainland, you need to swim to it. The channel formed by the Candlestick and the Mainland creates the potential for turbulent waves as they pass through it and break apart on the Totem Pole itself. There are also rumours that sharks haunt the waterway you need to swim, attracted by the close proximity of the various seal colonies. For me, the real crux of The Candlestick is found in the fact that I really don't like the open ocean... and I was going to be the one doing the swim!

On Saturday the 2nd January, Hugh Sutherland, Scotty Wearin and I decided to break in the new year in a particularly memorable way. Commencing the walk in from Fortescue Bay at 0630hrs, we arrived at the Cape Huay lookout at about 0730hrs, and were at the rap-point opposite The Totem Pole and The Candlestick by 0800hrs. As I was going to be doing the swim, I went down first, stripping down to my speedos, my harness, my approach shoes and not much else, much to the chagrin of my comrades.

I have to swim across that?
Me: not looking even slightly nervous...
Once I was joined by Hugh at the the lower platform just above sea level, I equalised the anchors on the ledge, tied the other end of my static rope to my harness, and was promptly smashed by a huge wave right as I was about to jump in. At this point, all my concerns about being eaten by Great White Sharks vanished, as I struggled to remember the rules for how waves operate ("...don't they come in sets of 9 or something?"). Because of the close confines of the channel and the volume of objects to aggregate the violence of inbound waves, every time a wave of any real size passed through, the water would rise by more than 3 metres before turning into a bubbling cauldron of violent whitewater, which would inevitably make both swimming the channel and exiting on the slimy slab on the other side potentially dangerous.


Arriving on the wet slab below The Candlestick.
Immediately after the next wave passed through (and before the water level could drop too much), I leaped 3m into the water and swam like Michael Klim to the other side. I manage to straddle a wet arete-feature below the anchors, just in time to be hit by a wave and very nearly knocked back into the sea. Struggling to get out of the water and up the wet slab (the low-tide coming-in meant that the anchors were several metres above the water level), I eventually resorted to heel hooking above my head and using the rising water level of a wave to propel me up onto the platform. Once there, I rigged the lower Tyrolean traverse, and was soon joined by Hugh who was kind enough to bring my clothes to put shivering me out of my misery. The platform was quite small, so getting dressed required some ridiculous semi-hanging-belay shenanigans, but eventually I was correctly attired and Scotty propelled himself across the Tyrolean  (scarcely a few metres above the waves) to reunite the team below our accidentally chosen route: The Corner Route (110m 4-pitch Trad 18). I say accidentally, because we'd originally intended to climb The Normal Route (16), but in my goal of setting an Olympic record in swimming, I'd swum to the wrong anchors, so it seemed we'd be climbing The Corner Route instead.

Hugh arrives at the belay right as a wave
breaks below him. "Don't get my clothes
wet, dude!"
Scotty taking a moment to soak in the atmosphere.


The Totem Pole looms over us... Like the Sword
of Damocles...


The lower Tyrolean Traverse past the Totem
Pole.


At the sea-level belay below Pitch 1.
   
Hugh, high on the brilliant first pitch (grade 18).
Hugh tackled the first pitch, which looked hideously loose, wet and dirty from the belay, but in actuality was a brilliant pitch of solid gr18 steep stemming corner-crack climbing past several small rooflets. He bridged his way up it while Scotty belayed and I dismantled the lower Tyrolean and pulled the rope over to our side of the channel. After Hugh arrived at the top, Scott headed up next trailing our static rope, and then he in turn brought me up on second via the static rope, before taking the sharp end himself.

The next pitch (solid gr17) was another great pitch, though with somewhat deteriorating rock. It blasted up a beautiful golden corner system with more conventional vertical crack climbing, before making some funky face-moves out left to gain the belay. All 3 of us powered up the pitch, and then it was my turn to tie into the lead-rope as I started up a hideously loose chockstone-filled offwidth. The pitch is supposed to be grade 15, and it might well be, but after about 6m of climbing (and struggling to avoid killing my friends with all the loose blocks trapped in the offwidth), I decided to traverse out right onto the face to gain a steep hand-and-fist crack, and climbed that to the top of the pillar instead. From the top of the pillar, it was an alpine-style adventure-wander up a thin crack, a corner, some huge blocks, and eventually across a narrow rock-bridge to the belay below the final headwall.

Scott starts up Pitch 2 (grade 17).
Scott seconding Pitch 1, while I dismantle the lower
Tyrolean. Note the original 70m rap rope still clipped
to my rear belay loop.


Hugh belays Scott across the final section of Pitch 3 (15)
while I rig the Upper Tyrolean.


Our adorning fans.


I belay Hugh on his variant Pitch 4 (the original
route takes the low-angle blocky corner seen at the
top left of the photo).
By this point, we were now in full-view of the Cape Huay lookout, and as our adoring fans gathered to bestow applause and cheers upon us (literally), Hugh made his way up the final headwall (grade 16) while I prepared the upper Tyrolean for our journey back to the mainland.

The last pitch is supposed to be grade 16, but Hugh was less inspired by the blocky corner system you're supposed to follow, and instead decided to start up a steep jam crack (maybe grade 18?) and then traverse left under a rooflet near the end of the pitch to regain the original line to the summit. Though a bit loose (due to a lack of traffic), it was certainly far more interesting than the original doddly line and made an entertaining way to finish the days climbing. Scott and I joined Hugh on the summit of the Candlestick for the obligatory photos, before abseiling back down to the belay below the headwall.


Scott on the Summit of The Candlestick.
Aaaand Hugh on the Summit of the Candlestick.


Looking down from the belay above Pitch 4 at Scott and I.
The tensioned rope to the left is the Tyrolean back
to the mainland.


Hugh starts up his variant to P4, while I
belay and Scotty Wearin looks on.

Photo taken by: Colin Loo


Now it was time for the 3 of us to get off this sea stack, and this is where things become a bit more complicated.

Bear with me if this is stuff you already know, but to those of you who've never seen a Tyrolean Traverse performed before, in the instance of The Totem Pole or The Candlestick, it requires that you trail the abseil rope (that you rapped in on) the entire length of the climb (you might have noticed us trailing it in some of the photos above), then slide across it (sort of like a flying-fox) under horizontal tension back to the mainland, and retrieve it in the same manner that you would a retrieval abseil. Suffice to say, it's bloody exciting, but in the case of The Totem Pole it's a mere 10m Tyrolean... on The Candlestick it's quite a bit longer.

Normally, you're supposed to abseil again from the belay below the 4th pitch of The Corner Route, and find the anchors below Pitch 3 on the Normal Route, then do a 30m Tyrolean back to the mainland... but since none of us could work out exactly where the anchors on the Normal Route were (and we didn't really want to go abseiling into the unknown and swinging around to find them), we opted to do the Tyrolean from the belay that we were on, which meant that the Tyrolean would be at a 30 degree decline back to the mainland, and necessarily longer than 30m. We'd found a section of 9mm static rope that had been abandoned between the mainland and our belay upon arriving at The Candlestick (which had likely been left in a non-retrieval setup and abandoned when the climbers realised that they didn't have enough rope to do the Tyrolean and retrieve their rope), so I removed that and with Hugh using one of our spare ropes to lower me under tension, I started to traverse across the void.

"Wow... That's a steep Tyrolean."
It was right at this point where I realised that
our Tyrolean rope wasn't long enough. The
other rope blowing horizontally in the wind
is the chopped rope that we retrieved.


We'd been hoping that our 70m rope would be long enough (especially with stretch) to bridge the gap, but it turned out that it was still about 10m short. And so, swinging around 10m above the summit of The Totem Pole, I used the section of rope we'd retrieved to join the end of the Tyrolean rope that I was trailing, and use that to make the distance back to the mainland. Once there, with the help of my Grigri and Jumaar to tension the Tyrolean rope, I managed to get it tight enough to completely remove this chopped section of rope (with the help of my cordalette), thus returning the Tyrolean to its original one-rope retrieval setup.

Scotty Wearin came across next, once again under a controlled lower-off by Hugh on a spare rope. Then it was Hugh's turn to show why he's a qualified climbing guide and the rest of us are just punters: once fixed to the Tyrolean rope, he used the last of our spare ropes doubled-over (retrieval-style) to lower himself across the void via an abseil. Obviously the doubled 60m rope wasn't enough to bridge the gap, so halfway across he had to pull and retrieve his abseil rope, and complete the traverse on his own. All in all, it was a pretty funky piece of technical ropecraft in a rather extreme location.
Hugh shows The Totem Pole who is really king
of the hill... Here he's about to pull the spare
rope he's abseiling off.


Hugh begins the 30 degree abseil/Tyrolean back to the
Mainland.


Once back on the mainland, we made the walk back to Fortescue Bay, and celebrated a great day out with some of my infamous unnecessarily warm beer (I can't be bothered leaving the fridge in my van running all day), and headed to Nubeena for a pub feed and more booze. The whole day had taken us about 11 hours car-to-car in a group of 3, and we certainly weren't hurrying.

So, what about the route, is it worth doing?  

Hell yes! Though not particularly hard, it is a true all-encompassing adventure-route that epitomises Tassie climbing. Obviously the level of Ropecraft skill necessary to get through the day without drama (or having an epic) is quite high, as are the number of external factors that can affect success or failure (wind, rain, sea-levels), but the quality of the climbing on every pitch (except perhaps P3) is surprisingly good for an adventure route at the arse end of the world. To me a route like this feels like a final assessment of everything one might learn as an adventurous climber, with multiple ropes to manage, two Tyroleans (one just metres above the sea, and the other ordinarily requiring 2-ropes to facilitate retrieval), gear management /efficiency (especially the change of clothes for after the icy swim), and adventurous trad in an intimidating location. Lots of people attempt The Totem Pole each year (even though a lot of people don't tick it) without incident, but there's a reason why the Candlestick doesn't get the same kind of traffic: because it demands an adventurous spirit. Get on it!

Me at the belay below the 4th pitch, bringing Hugh up on 2nd (he is trailing the Tyrolean rope), while the stuck
rope that we later retrieved remains fixed between our belay and the mainland.

The Totem Pole looks really insignificant from here.

Photo taken by: Colin Loo


Talk is Cheap

I was on the 3rd day of the siege of my Project, residing at my improvised campsite atop Bare Rock, when Gerry Narcowicz called me up with a proposal to climb Talk is Cheap (10-pitch Mixed 24) on the Mount Brown main face, at the Tasman Peninsula.

Talk is Cheap has an amazing reputation as one of the harder predominantly sport adventure multipitches in Tassie, and it's a route that I've been trying to get on for almost a year. Put up by Garry Phillips and Simon Young, it is relentlessly overhanging, extremely committing (it's not really possible to bail one you commit to the rope-pulls on the abseil in), and with a fairly decent chunk of hard climbing... all of this over the sea.

Abandoning my siege of The Obsidian Obsession, I met up with Gerry at Mount Brown, and on 17 January 2016, we set about proving just how cheap talk really is.

Aaaannd my rope goes into the ocean... dammit!
The walk up to the summit of Mount Brown takes just under an hour, and after a prolonged search for the rap anchors (and eventual success) we racked up, and rapped in. Even the 2nd abseil (down Pitches 6 and 7) is quite overhanging, and as I was going down first I had to clip the rap ropes through several quickdraws just to stay in contact with the rock. The abseil down Pitches 2 and 3 in particular are ludicrously steep and were quite hard to negotiate, but eventually we were at the belay atop Pitch 1, looking down as the huge waves blasted the platform below us (and tossed the sea-bound end of my rope around like a piece of string). With the ropes pulled, we were now fully committed, but as neither of us was psyched at the idea of getting wet on the lower platform, I abseiled down to the belay below Pitch 1 and had Gerry top-rope me back up just so that I could score the full tick.


Gerry Narcowicz abseiling in through ridiculous steepness.
Even on second Pitch 1 is pretty cool. Generally quite easy, but with huge exposure (the cacophonous waves are exploding just below your feet, despite being 10m above the normal waterline) and consists of interesting feature-climbing. It also made a good warmup, as Pitch 2 is the crux at gr24, and no softie at that.

I continued up into Pitch 2, which starts with some funky slabbing to the first of a series of roofs. Turning the first roof was both a shock to the system, and downright outrageous, with gymnastic, leg-flicking moves to gain a steep crack out left and a ludicrous high-heel rockover to get established on the face above. Continuing up the enjoyable face I encountered the second roof, which begins with powerful moves up a double-flake system to a pumpy stance, and a difficult decision...

The belay from the platform at the start of the climb.
The waves break directly below you, propelling
whitewater past the belay platform.
I believe that the original line goes left from this stance, climbing above the bolt (the bolt is at your feet when you start this particular sequence) and up to a horizontal break via very committing moves up a left-hand vertical sloper-rail, and a huge deadpoint. As evidenced by all the chalk on the route (and chatting to several locals who have climbed it), it seems that most people have been heading right through this sequence, moving several metres away from the bolt to stem up a steep corner and move back left on the horizontal.

I hesitated for quite a while, moving back and forth between the two possibilities before finally deciding that I wasn't psyched on taking a potentially huge swinging fall onto the slab below (and believing the right-hand path to be off-route), and attempting the left-hand line above the bolt. I made it to the final deadpoint, reaching the horizontal break... and grabbing a handful of gravel (that had accumulated on the break), before hurtling off into space and smashing into the slab. I took this unpleasant fall 2 more times (both times making the break, but just grabbing debris from the delaminating dolerite) before the horizontal was clean enough to stick the move, and I continued upwards, turning the final rooflet with some funky laybacking and gaining the belay.


Gerry, just after the main crux on Pitch 2.
Whether or not the route is supposed to go direct as I tried to climb it (with a move that I would call gr25), or out right as the locals have been doing, this section really needs another bolt, as -considering how well bolted the rest of the climb is- there's no reason why there isn't another bolt protecting the hardest move of the climb (and no, there isn't any optional trad placements to protect it), especially considering how good a stance you have to clip it from. It would also indicate exactly where the line is supposed to go, and -if nothing else- would mean that it's possible to pull past this move without having to stick it (the guide says that you can get past it with grade 22 climbing... sorry, but I call bullshit on that). Regardless of my frustration (and painful impacts), it was a stonker of a pitch with monolithic exposure, marred by the amount of rubble on the crucial horizontal break.

Gerry soon joined me at the belay, struggling a bit because of his severely injured right wrist (he's finally decided to have surgery to get it fixed!), and I set off again on the sharp-end to tackle Pitch 3 (22). This pitch begins with a funky slab traverse and into a steepening face which leaves you in a stance below a square-cut roof. Some engaging and thin moves lead you further right under the roof (with your feet toeing another undercut roof), before you enter the crux: getting all horizontal via a huge undercling, and a bouldery move past the lip to gain the slab. There's an interim belay here if you feel like using it, but I'd been careful with my rope management, and continued upwards, linking Pitch 4 (16) into Pitch 3 and soon arriving at the belay.

Captain Mullet leads the rather unpleasant
Pitch 5 (20).
Gerry took the sharp-end for Pitch 5 (20), which -unfortunately- was the worst pitch by far. Starting up a gear protected grotty corner, you move contrivedly out right onto the grotty, loose face, and head up that with generally unpleasant climbing, before finishing back out right in another corner system. The gear, rock, and climbing were all pretty rubbish, and a fall at the 2nd bolt would be rather painful. I was glad it was Gezza who had to lead this pitch, so that I didn't.

Next up was the grade 23 Pitch 6. For some reason I didn't bring any cams with me on this pitch, so getting to the first bolt was quite the runout through much juggy steepness (there were, however, good cam placements if you remember to bring them). It goes up through more steep terrain on predominantly big slopers, unfortunately all of which are in the process of delaminating. I'm embarassed to say that I slipped off at the 3rd bolt trying to clip it as the sloper I was holding rapidly disintegrated. After some token complaining, I had a thoroughly enjoyable battle to the end of the consistently steep pitch, which features a particularly memorable move past a pocket-slot, which -the way I climbed it- required me to remove my left hand one finger at a time, and transition my right hand into it... one finger at a time. Again, an entertaining pitch with some rubbish rock... though this is to be expected on an adventure climb in a location like this.

Looking down from atop Pitch 8.
If you look closely, you can see two
climbers down there on I've Heard it
All Before (23).
My last lead of the day was linking Pitch 7 (22) into pitch 8 (19) for another huge pitch. Pitch 7 follows an enjoyable left-facing corner-system with a mixture of gear and bolts, with a rather malevolent tips-layback guarding the easier path to the anchors. Pitch 8 heads up a right-facing corner, with the moves getting continuously harder until it becomes extremely technical stemming on gear (grade 19? Seriously? Damn, I'm getting soft), with a committing move out right to exit the corner and mantle up on slopers.

Naturally Bridgemaster Zero -aka, the Stem-master, though some know him simply as Gerry- loved this pitch, and with the excited grin of an 8-year old after his first trip to Disneyland, he lead the last two pitches (gr17 and gr8, respectively) to the top-out. It's worth noting that Pitch 9 harbours a malevolent mantle on slopers at the end of the pitch, which felt absolutely desperate to me.

Joining The Narcoblitz on the summit, the entire route had taken us just over 6 hours from rap-in to top-out, though we certainly weren't hurrying. Making the long walk back from Mount Brown to the carpark, and debating the merits of the climb, Gerry and I came to this consensus:


Belaying from atop Pitch 8, right as the sun hits
the wall... Spectacular!
  • 3-star position - Exposure, location, length, adventurousness.
  • 2-star climbing - Moments of brilliance, with sections of hum-drum climbing, and a few genuinely unpleasant sections.
  • 0-star rock - The worst I've climbed in Tassie (up until a recent pitch of climbing I did at Pavement Bluff, Ben Lomond), and not far removed from the rock quality I experienced on Church of the Seven Samurai (4-pitch trad 24 in the Blue Mountains - covered in my last blog update). Much of it was delaminating and gravelly, other sections were just plain old blocky choss. (While we were on this route, a Hobart climber broke a jug off a neighbouring route on the main face and decked back to the ledge... good thing Tassie climbers bounce well).
Equals a 2-star (or Very Good) route.

I'd recommend it to anyone, but with the proviso that this true adventure climbing (in the vein of Frenchman's Cap, or the Upper Ben Lomond Plateau, or Federation Peak). Not merely "adventurous" in the sense of location, length and commitment, but with an air of Alpine climbing... that just happens to be over the sea. That is to say, that the position is the real selling point.


Afterword...

So, I just got back from several days repeating some rather full-on adventurous hard trad routes at Pavement Bluff, and am currently residing above Bare Rock, waiting for the sun to leave the wall so that I can get back to the siege of my Project.

As I sit here pontificating on climbing (and avoiding doing any study) one thing that is really cool -in an egoistic, materialistic kind of way- is that the release of Simon Carter's new Blue Mountains Climbing - 2015 Edition- features several of my new routes that I'm particularly proud of.

It's not merely a case of seeing your name in print (though, I confess, that is a factor), as in this guidebook 19 of my routes are in print (though several others remain out of it)... But rather, it's about the idea of Legacy.

For many people, their Legacy might be seen in their children (as representations of themselves), or in a magnum opus that they might write, or in a business they build from scratch, or in how they contribute to the shaping of their local community.

But for someone like, who -by societies standards- really has no life, and very little chance of leaving behind a conventional Legacy, the piece of me that lives on in the minds of others can be found in my routes. If -for some crazy reason- someone ever wanted to know "Who is Paul Thomson?", all they need to do is chuck a lap on The Obvious Elbow of Aristocrat Arthur Decanter (58m gr26) at Pierces Pass, and they'll "get" me.

Maybe that doesn't matter to anyone else. But for me, it gives me motivation to continue going against the grain, and ignoring what I might be expected to do in order to achieve some sort of conventional sense of Legacy.

Or I'm just a selfish, pretentious showpony... either way...

Until next time, be safe.


Tuesday 12 January 2016

NOW we're talking OBSCURE!


So, it's been a while since I updated this, but fortunately I have a great excuse: I've been on a climbing rampage in Tasmania! I'll get to the details of this aforementioned rampage in my next blog update... As for now I want to cover the obscure adventures that went down after I returned from the USA, and before I headed back down to this isolated little island that I now occupy.

3 weeks is a surprisingly short amount of time to return from a long-ish trip, get your affairs in order, book into a TAFE course and climb some obscurity before departing for an indefinite amount of time in Tassie (yes, my life is downright unlivable, pity me!)... But I managed it...


Pierces Pass Obscurity


First up, Neil Monteith -who shall henceforth be known as Daddy Neil- managed to skive away from cleaning up baby vomit and working on mass-market television, and actually do some climbing. Thus, team Choss'N'BadGear reunited for some of our usual masochism. The world was our oyster, we could have gone anywhere... but for no particular reason we decided to go to Pierces Pass to climb some "obscure trad classics".

Neil "loving" the first pitch of By Hook or
By Crook (23)
.
Our first target was a route that I'd been talking about since the first time I climbed The Colours of Spring (4-Pitch Trad 21) at Pierces Pass East Side. On abseiling off that route I cast my appraising eye on the stunning 2nd pitch of By Hook or By Crook (2-pitch Trad 23), put up by Mark Wilson et al. in the dark ages, and I knew that I'd have to come back to climb it. Situated opposite the remarkable (and remarkably chossy) Fungus Face (4-Pitch Trad 18), the first pitch climbs a pumpy steep face via pocket-clusters, horizontal breaks, and a desperate sequence of micro-crimps, before boldly heading out to a rounded arete and climbing that past a carrot bolt to the belay. This pitch was Neil's, and he made it look every bit of old-school trad 21 as he fiddled in an interesting arrangement of gear, contemplated the meaning of life while deciding whether or not to commit to the arete, and inevitably cruised up the tenuous, balancy arete once he decided to commit. Despite the ordeal, he still managed the Onsight. The pitch was a bit wandery in a beard-stroking kind of way, but it followed the best climbing (even if it wasn't perhaps the most obvious line) and was quite sustained with a sting-in-the-tail final sequence to get established on the top slab.


An immaculate open-book corner on
perfect rock in the Blueys!
The 2nd pitch at gr23 is one of the best-looking fused corner-systems that I've ever seen in the Blue Mountains, on immaculate blank rock (for the Blueys) and in a great position. I'd coveted this pitch since I climbed The Colours of Spring, and Neil was kind enough to relinquish it to me without too much of a fight. In short: the climbing was every bit as good as it looks, featuring 3 separate (and varied) technical cruxes - the sort of involved, convoluted puzzles that are infinitely rewarding to solve and pull-off clean. It also harbours very spaced and fiddly gear (but just enough of it to keep the climbing heady without being dangerous), and it stays on the right side of bold with the help of 3 carrot bolts. Despite what the guide said, I had no trouble whatsoever putting on the bolt plates, and thoroughly enjoyed 95% of this pitch... until I mantled onto the mega-choss (dislodging a television-sized block in the process, and managing to hold it in place just long enough for Neil to get under cover... at which point it bounced down the cliff and demolished an outcropping of trees and -predictably- our packs), and arrived at the "rap anchors" (two carrot  bolts... and nothing else).


"Oh my God, Neil... it's SO GOOD!"
Technically this wasn't the rap anchors for our climb, but was actually the belay below the start of pitch 4 of The Colours of Spring. The problem is that where-as once upon a time you could rap off a tree at the top of Pitch 4, the tree has since burned down and getting off from the top involves either a million chossy exit pitches, or a mini-epic (I found this out the hard way when I climbed The Colours of Spring... we went for the mini-epic option... and it was epic). Despite knowing this, I still thought that we might have been able to down-climb to an actual set of rap-anchors 10 vertical metres (and a sketchy traverse) below, but in the end this just wasn't happening, and so it was that a Mark Wilson route at Pierces Pass claimed some more gear (fortunately for me, this time it was Neil's gear) -does Mark build his rack from all the gear left behind on his climbs?- and down we went.

I'd recommend this climb to any solid trad climber (even one who isn't an Obscurist, because in reality the high quality of this line belies its obscurity), provided that they don't mind a bit of moderate boldness.


Neil forging his way up the megapitch (Pitches 1 & 2) of Church of the
Seven Samurai.
So, with one winning line under our collective belts, Neil and I decided to enjoy a leisurely afternoon (har har) making our way up Church of the Seven Samurai (4-Pitch Trad 24). This climb starts just left of Bladderhozen (3-pitch 23 -another great climb, though solely for the stunning 3rd pitch, and not for the unmemorable 2 access-pitches) at Pierces Pass West Side, and like it's multi-starred neighbour, involves two face-y access pitches to get to the real climbing. That is to say, that if you climbed them as two separate pitches, they might be mistaken for pleasant but conventional "access pitches", but Neil opted to join the two pitches into a 60m megapitch which -as far as I'm concerned- changed the dynamic of these "access pitches" into something special. A 60m marathon of climbing means strategic gear-placement, running out of gear, rope management issues, rope drag, prolonged pump and the mental weariness of staying focused for such a long period of time. Provided none of these challenging elements becomes catastrophically bad, they have the capacity to add value to what might be a value-less pitch, and so it was that both Neil and I found ourselves really enjoying this giant pitch of climbing as one of the finer adventurous offerings at Pierces Pass. The prolific spattering of funky pockets throughout probably helped to win our support as well.


Me entering the crux section of the gr23 3rd pitch.
The 3rd pitch is a 30m gr23 up a steep stemming corner, and I launched up it with gusto, battling sandy and muddy holds as I came to grips with the unconventional line. This pitch starts up the corner with some rad stemming moves, pulls a few moves on the right face, traverses across the corner via some hard moves, climbs the crux on the left face via a powerful sequence (off a slopey pocket and into an open-handed undercling high above), and finishes up the steep corner to the belay. I managed to Onsight to the crux, but the crucial slopey pocket was muddy and I eventually fell off with my hand on the undercling. The rest of the pitch after the crux was quite sustained, as Neil found out when he linked past the crux on second, then found himself battling tooth and nail to the top as the pump set in. Regardless, he managed the feat, and we both agreed that -despite the irritating muddy pocket- it was a pearler of a pitch, especially considering the seemingly bizarre path it follows (which makes total sense when you climb it).

Neil starting up the amazingly steep and bouldery
4th pitch.
I was fortunate enough to also score the 4th pitch, which encompasses a short but intense 15m section of very steep corner climbing at grade 24. The climbing turns bouldery as soon as you set off, and I'll admit that it was a desperate battle as I fought to read the route and push through the pump-factor for the Onsight. Though short, it featured a really involved balance of stemming, steep arete-slapping, and strenuous sloper-hauling, finishing at a really strange hanging belay at the steepest point of the corner. Both Neil and I got it clean, and -again- were pretty chuffed with both the pitch, and the route in general. Though not as consistently good as By Hook or By Crook, there could be no doubt that the climb had a lot to offer keen hard-trad enthusiasts, especially as the usual over-abundance of horizontal breaks, choss bands and vegetation were conspicuously absent. Yet again, I find that I would readily recommend this route to others.

It's worth pointing out at this point, that after so much time climbing on immaculate American rock, my tolerance for choss and ironstone dinner-plates was at an all-time low, so the fact that we'd managed to launch up two esoteric routes and come away singing their praises speaks volumes for just how good they are (on the scale of Blueys trad climbing).

The following day we opted to tackle another big trad route, though one that is somewhat less obscure and features a million stars in the guidebook: Contented Cows (7-Pitch Trad 22). I knew a few people who had climbed the route, and -if I'm honest- I hadn't really heard anything good about it, with stories of huge runouts, bad rocks, and epics a-plenty. The consensus seemed to be that it definitely didn't deserve the stars ascribed to it.

Pitch 3 (19) of Contented Cows (22)... there's a Neil somewhere
in the vegetation at the top of that slab.
Arriving at the base of the route at about 8:30am, our first surprise was to see a line of bolts stretching as far as the eye could see. It seems that the insatiable Mikl -knowing that the first 3 pitches are often used as an easier alternative start to Hotel California (10-pitch 23) to produce a more consistent long climb, had chosen to retrobolt the lower half of Contented Cows. Thus, despite lugging a thousand kilograms of steel with us, it all remained on my harness as I sport-climbed my way up the first two pitches of grade 17 dirty grey-rock (linked to create a 62m pitch), and Neil thin-slabbed his way up the 3rd pitch (which features an utterly diabolical move past an undercut roof near the top... grade 19 my arse!) to arrive at the first of the gardening pitches.


Neil questing into the traddy unknown on
Pitch 6 (22). Hotel California continues
the traverse right out to the arete.
Shared with Hotel California, for the most part these doddly pitches have more in common with alpine climbing over steep scree than conventional rock climbing (though at the end of Pitch 5 it reverts to actual climbing). Choosing to forgo the usual bolted finale to Pitch 5 (which climbs a thin face to the right of an obvious corner-system) I decided to tackle the corner instead, and was about 6m up it before I realised that I had left most of the gear with Neil. Almost unprotected, and battling horrendous rope-drag (my habit of linking pitches came back to bite me in the arse once again!) and fragile rock, the actual moves I was pulling on this steep corner-system suddenly seemed quite challenging indeed, and I was more than a little relieved to arrive at the belay below Pitch 6 in one piece.


Pitch 6 (grade 22) is where the real climbing on Contented Cows begins, and it was up to Neil to take the sharp end on this one. Beginning on the infamous Grade 19 traverse of Hotel California, the line then leaves the bolts behind to launch up an incipient seam that breaches a small rooflet and continues up a headwall above, with all the void stretched out below you.  Though technically soft at the grade, there can be no denying that the questing up into the unknown (as the rock above appears rather blank, and the climbing looks utterly nails) is intimidating. Nevertheless, Monty cruised it in fine style, and I have to say that it was a stellar pitch of old school trad face/crack climbing.

"Hooray, I'm gonna die!" Just about to
start up the final gr22 Pitch.
The final pitch, also gr22, was mine, and I remembered JengA telling me horror stories about monster runouts, difficult route finding and dubious rock. As it turns out, all of the above are true, but lie within acceptable standards for Blue Mountains adventure climbing. It starts with a carrot-bolt-protected bit of steep thuggery through a roof, a hand traverse right onto some thinness, and -what is probably the crux of the pitch- some more thin moves to get established on the face. From here on up the climbing gets progressively easier, as you meander back and forth in a generally upward direction, linking together sections of face-climbing to gain horizontals or chicken-heads for gear. As far as route finding goes, there really wasn't an "obvious line", merely a path determined by treading the balance between finding gear, avoiding the choss, and trying not to end up stranded in sections of blank space. The gear is there, but it is generally a bit old school and somewhat spaced, (and considering that the pitch is 50m long requires a bit of gear management to avoid running out before the top). Soon enough I had Onsighted the Pitch, and Neil and I  were making our way back along the well worn trail to Bells Line of Road.


Monty seconding Pitch 7 (22). Those slung ironstone plates
are bomber I tells ya!
The whole round trip had taken Neil and I about 6 hours car to car, which wasn't too bad considering that we weren't really hurrying (nor were we dragging our feet). As to the quality of the route... well, it certainly couldn't compare to quality of the routes from the previous day, mostly because Contented Cows really is just 5 rather rubbish access pitches to gain the top two really good pitches of trad climbing. I think that the ideal way to climb this would actually be to do all the bottom pitches of Hotel California, and then finish up Contented Cows, though that would mean that you'd have to lug a double rack of trad gear through all the ring-bolted pitches of Hotel C... Still, if you wanted to make this route a Classic, that would be the way to do it.


Sublime New Routing


The rough path of my new Project at Sublime
Point East Face (The Acedia Antithesis) marked
in red.

In the interim between climbing obscure trad and more conventional days of sporty-sport cragging with friends, I investigated a new route on Sublime Point East Face that I'd spied when I first climbed Subliminal (3-pitch 23) at night with by old buddy Gene Gill several years ago. Though mostly an unknown climbing destination (and requiring different access to the normal Sublime Point climbing areas), Sublime Point East Face already offers one classic multipitch in the form of Subliminal, and another gem in Castaway (4-pitch 21). The area has also been added to Simon Carter's most recent (2015) edition of Blue Mountains Climbing, so that is sure to do something for its popularity.

When I climbed Subliminal in the dark, I ended up off-route by remaining on the face too long (Subliminal heads out left to join an immaculate arete about halfway up... I didn't see the bolts on the arete in the dark) and -despite the terror of the monster runout and the inevitable ball-shrinking fall I took when I realised I was off-route and couldn't reverse what I'd climbed- I found the climbing on the relatively untouched central face to enjoyable and awash with possibilities. For years I toyed with the idea of returning to try and establish a route up the guts of the wall, and so it was that I finally spent a few days doing exactly that.

The entire first day was spent swinging around above the void, placing the odd expansion bolt or cam to pin the route, doing some rope-soloing to see if sections of blankness went free, and trundling sections of mega-choss. By the end of the day I'd pieced together a plum line right up the centre of the wall on some of the best (water-polished and bullet-hard) rock in the Blueys. It took 2 more trips out there to finish equipping the route (during which I also re-slashed the access trail from the carpark down to the East Face rap-in), but at last the Acedia Antithesis project is ready to rock, and I am very excited about it.

Weighing in at 26/27, the route starts from a reasonable footledge in the middle of the wall (only a few inches above the lowest point of the undercut face and the sucking void below) and heads up, up and more up. It crosses the Subliminal P1 traverse and -at 15m- enters a V4/V5 crux followed by a core-intensive no-hands rest, a very awkward V3+ middle-crux, and a final V4 crux right near the end of 40m of climbing. Aside from the (active) no-hands rest after the first crux, the route itself is never easier than gr22, and considering the intimidating steepness, it could prove quite the intense toughie to tick.

The main pitch ends at a cosy belay in a huge cave, after which you traverse left (past an additional bolt) to rejoin Subliminal near the end of its 2nd Pitch, and link this to the top for a 35m exit pitch.

Now I just have to get back from Tassie to Send it!


The Road to Samarkand


Of all the hard trad must-do classic routes of the Blue Mountains, the most overt gap in my résumé was the fact that I still had never gotten around to climbing Samarkand (5-pitch Trad 25) at Pierces Pass, a route that I'd been led to believe (from others I know who had climbed it) might very well be the best hard trad route in the Blue Mountains. A part of Samarkand's fame is in its uncharacteristic unrelenting steepness, purportedly overhanging 30m in the first 100m of climbing, and with every pitch from start to finish involving some form of steep climbing.
 
Somehow, finding himself with a day off from work (conveniently on the very day before I left for Tasmania), Ben (Jenga) Lane -my old partner in crime- and I decided to stop procrastinating and just go and climb it. We were joined by Simon Carter who -as an aside during discussions of his newly released guidebook- had expressed a decided amount of psyche to accompany and document the adventure. Also, Simon had a 200m static rope, which was a pretty crucial part to negating the hideously dodgy set of abseils to gain the base. And so it was that on Friday 11th December we made our way back to the always memorable Pierces Pass for yet another adventure. After re-flaking and coiling 200m of static route (no small feat in itself), and having a lively debate about the best way to equalise 3 terrible carrot bolt rap-anchors without wasting carabiners (Simon won with his solution utilising nested Alpine Butterflies), we made the exciting 180m abseil to the base of Samarkand.

The mighty line of Samarkand (25) is the
steep thin corner system (leading to the
grey slab) right of the waterfall.
The traditional flip of a rock meant that I'd scored the crux pitch (I was pretty stoked with that, as I'd always wanted a chance to test myself against it), so Jenga got the ball rolling with the first pitch, a 25m gr23 with 1 carrot bolt and gear to protect it. It starts up a chossy small-corner feature leading to a rooflet, which is turned to reveal a really rad trad-protected water-polished slab, with engagingly thin and slippery moves to the anchors. After a shaky start (Jenga hates stemming corners) he cruised to the anchors, and I soon joined him there for the 2nd (crux) pitch.

The 2nd pitch is 40m long and intimidating steep. 2 carrot bolts protect the boulder-problem start to gain the crack proper, after which it's all gear to the finish line, with the climbing getting progressively harder until the very last moves. After a false start on the initial boulder problem (I slipped off a wet footer at the 1st bolt), I started again and this time stuck the moves without any difficulty. The line then traverses right on a fist crack to gain the main crack system, which consists of gear-protected extremely steep face climbing on good holds (and the odd obligatory jam) to gain a body-squeeze chimney. The chimney provided me with a pleasant no-hands rest, but exiting it proved to be a thrutchy challenge as you burst from the top of the constriction and into a steep thin-hand crack, culminating in a ludicrous dead-point to a good incut jug out right, quite some distance above the gear. After this, it's crux-time, and like the eternal bumbly I am, I accidentally wacked a #1 cam in the crucial knuckle-lock slot as I moved into the crux. Realising my mistake almost immediately but deciding just to wing it, I forged upwards with powerful, insecure thin-hands and ring-locks on awkwardly placed feet through much steepness. Feeling my momentum slipping away as I struggled to work around the cam, I launched for what I hoped was a jug... and promptly fell off as it revealed itself to be a sloper... one move from victory! After the fall, I swapped the bad cam-placement with a better one and made it to the belay. Jenga soon joined me, getting hilariously stuck at the top of the chimney (he's a much bigger bloke than I am), but getting the entire pitch clean on second. I take solace in the fact that he was working on those awkward top moves (Jenga has a tendency to cruise everything and make it look easy), but full credit to him for the clean lap.

Jenga on the crux of the first pitch (23)
Simon Carter's breathtaking photo of me
on the crux of the 2nd Pitch (25)...
about 3 moves before I fell of.


Jenga negotiating the moves to gain the
squeeze chimney on Pitch 2. If you
look carefully you can see our
chalk on the waterwashed-slab
far below.


Jenga begins the crux sequence right at the end of Pitch 2.


Simon Carter capturing Jenga in all his glory
on Pitch 3 (23), immediately after the crux
tips-layback section.

A tips-layback forms the crux of the 3rd pitch, which can be either extremely tenuous (if you have big fingers) or rather cruisy at the grade (with small fingers). Jenga was lumped in the first category, and made it look seriously hard as he stuffed a half-centimetre of finger-tip in the fused crack, and committed wholeheartedly to steep, water-polished smeared-foot laybacking to gain the better holds. Of course, he got it clean (and Simon got some really rad photos of the crux moves in action), and was belaying me up a few minutes later. Unlike Jenga, I could get my fingers into the crack to the first joint and didn't find it too hard, but regardless it was an outstanding pitch with some amazing exposure as the corner you're laybacking joins a hanging arete to remind you just how far above the void you really are.


And here is how that shot turned out. Jenga on the crux.
"Hi Simon, fancy meeting you here, mate!"


Me on the crux of Pitch 4 (22). Still no response from
PlayGirl
magazine yet... I don't think that Simon's to
blame, though.
I think of the 4th pitch as the beginning of my career as a male model, as I up-climbed and down-climbed the grade 22 crux about 5 times (while Onsighting) so Simon could get the perfect shot. I even climbed it without clipping all the bolts to make it look just that little bit more inspiring. Despite being gr22, I thought it felt quite easy at the grade, consisting of extremely steep corner-crack climbing, separated by some funky face moves up a scarily detached flake, and finishing with some awkward steep squeeze-chimney moves to gain the belay. Yet, despite perhaps being soft-ish, the climbing was heaps of fun, and I eagerly await a response to my male-model application submissions to PlayGirl magazine.
 
The last pitch of the day, climbed right as the sun hit the rock, was up a funky leftward leaning crack which is very obvious when observed from Walls Lookdown, and proved to be no giveaway at grade 21. Blinded by the light, Jenga oozed his way up the crack methodically (but solidly), with an interesting variety of crack moves (of all sizes) and slightly-steep thin-face moves protected by solid but fiddly gear placements. He managed to Onsight this pitch (and thus the entire climb), and I cruised it on second, and we joined Simon back on Lunch Ledge about 6 hours after we started the abseil, and right as the crag went into the full scorching summer sun.

Jenga tackles the surprisingly tough Pitch 5 (21).
Equal parts crack-and-face climbing.
Suffice it to say, the day produced some great photos from Simon (the ones that look good) and myself (the ones that look half-arsed and were taken with my little point-and-shoot clipped to my harness). I've reproduced a few low-quality versions of Simon's photos (thanks, Simon!), but if you want the full glory you'll need to check out the December edition of Simon's ONSIGHT newsletter, which features the photo-essay of our Pierces Pass antics.

So, what of the route? Well, straight-up, it's a 5-star classic, featuring possibly the best hard-trad climbing I've done in the Blueys (and is perhaps the best trad multi I've ever done in the Blueys, regardless of difficulty), with every pitch having something to offer and generally great rock throughout. At the grade, it's a middle-tier gr25 (not even the usual trad-esque sandbag we've come to expect over the years) and is so well protected that I don't think that the grade should dissuade anyone who can dog a trad 25 from having a crack at it. In fact, it's so good, that when I get back from Tassie I'm super-psyched to have another crack at it so that I can clean up my 1-fall ascent of the crux pitch and score the true tick. Unlike some trad multis in the Blueys, there's nothing about Samarkand that would ever discourage me from launching up it again... well, except for perhaps the rubbish abseil in. Seriously, borrow yourself a 200m rope (or join 3 x 60m statics and do it as a giant rap moving past the knots on the way down).

Well, it's time to end this blog update and get back to climbing in Tassie. I'll endeavour to update some of the more recent Tassie adventures in the next week or so, and I've got a few good stories to tell that you guys might enjoy. The interesting epiphany to come from this brief stop-over back home on my way to Tassie, is that despite climbing 4 seldom repeated trad multipitches in Pierces Pass, all of them were enjoyable in their own way, with perhaps the least obscure of them (Contented Cows) being of the lowest quality.

Don't ever say that obscure correlates to esoteric when it comes to Trad climbing in the Blue Mountains...